サイトを携帯対応に

Google携帯プロキシ(Google Mobile Proxy)を利用して手軽にサイトを携帯対応にする。

RewriteEngine on
RewriteCond %{HTTP_USER_AGENT} ^DoCoMo.* [OR]
RewriteCond %{HTTP_USER_AGENT} ^KDDI.* [OR]
RewriteCond %{HTTP_USER_AGENT} ^Vodafone.* [OR]
RewriteCond %{HTTP_USER_AGENT} ^SoftBank.* [OR]
RewriteCond %{HTTP_USER_AGENT} ^J-PHONE.* [OR]
RewriteCond %{HTTP_USER_AGENT} ^Mozilla.+DDIPOCKET.* [OR]
RewriteCond %{HTTP_USER_AGENT} ^Mozilla.+WILLCOM.*
RewriteRule ^$ http://www.google.com/gwt/n?u=http://www.-----.com [R,L]

.htaccessをテキストエディタで開いて「www.—–.com」の部分を自分のサイトのURLに書き換え、アップロード。Nucleus限定ではなく、どんなサイトでも使えるようだ。
Google携帯プロキシ用.htaccess

画像のポップアップでスクロールバー表示

今まではモニターより大きいサイズの画像は、スクロール出来なくて全部見ることはできなかった。F11でフルスクリーンにすると見れるが、わざわざフルスクリーンにしなくても、モニターより小さい画像はスクロールバーは出さない、モニターより大きい画像はスクロールバーを出すという風にして、大きいサイズでもスクロールして見ることが出来るように変更。
テスト画像1 (2400✕1600)
20130119-_dsc2904
テスト画像2 (1200✕800)
20130119-_dsc3565
/nucleus/libs/BODYACTIONS.php を変更

■スクロールバーを出すように変更(scrollbars=noをyesに変更)
136行目を変更	$vars['popupcode'] 		= "window.open(this.href,'imagepopup','status=no,toolbar=no,scrollbars=no,resizable=yes,width=$windowwidth,height=$windowheight');return false;";
                   ↓
$vars['popupcode'] 		= "window.open(this.href,'imagepopup','status=no,toolbar=no,scrollbars=yes,resizable=yes,width=$windowwidth,height=$windowheight');return false;";
■scrollbars=yesに変更すると常にスクロールバーが出るので、画像が小さい場合はスクロールバーを出さないようにする。
132行目を変更	$windowwidth = $width;
                   ↓
$windowwidth = $width+5;
133行目を変更	$windowheight = $height;
                   ↓
 		$windowheight = $height+5;

ファイル改竄検知システム(Tripwire)

Tripwireはサーバーのファイルの改竄を検知するシステム。 Tripwireを使用すると、重要なシステムファイルとディレクトリに対する変更をすべて検出することで、それらの保全性を確保することができる。セキュリティを万全にするために、ファイルが改竄される前に、Tripwireをインストールして基準データベースを作成しておく。基準データベースが作成されると、Tripwireは現在のファイルをこれと比較し、変更、追加、削除のいずれかがあれば報告するようにする。
■Tripwireのインストール
Tripwireをダウンロード(最新版 をダウンロード

[root@server1 ~]# wget http://downloads.sourceforge.net/tripwire/tripwire-2.4.2.2-src.tar.bz2
ダウンロードしたtripwireを展開
[root@server1 ~]# tar jxvf tripwire-2.4.2.2-src.tar.bz2
Tripwireの展開先ディレクトリへ移動
[root@server1 ~]# cd tripwire-2.4.2.2-src
tripwireのインストール
[root@server1 tripwire-2.4.2.2-src]# ./configure --prefix=/usr/local/tripwire sysconfdir=/etc/tripwire && make && make install
Press ENTER to view the License Agreement. ← 空ENTER
SPACEキー押下でライセンス表示を流す
Please type "accept" to indicate your acceptance of this
license agreement. [do not accept] accept ← acceptを入力
Continue with installation? [y/n] y ← y
Enter the site keyfile passphrase: ← サイトパスフレーズを設定
Verify the site keyfile passphrase: ← サイトパスフレーズを再度入力
Enter the local keyfile passphrase: ← ローカルパスフレーズを設定
Verify the local keyfile passphrase: ← ローカルパスフレーズを再度入力
Creating signed configuration file...
Please enter your site passphrase: ← サイトパスフレーズを入力
Creating signed policy file...
Please enter your site passphrase: ← サイトパスフレーズを入力
The installation succeeded.
tripwire展開先ディレクトリを抜ける
[root@server1 tripwire-2.4.2.-2src1]# cd 
tripwire展開先ディレクトリを削除
[root@server1 ~]# rm -rf tripwire-2.4.2.2-src 
tripwireを削除
[root@server1 ~]# rm -f tripwire-2.4.2.2-src.tar.bz2
tripwire実行ファイル格納ディレクトリへパスを通す
[root@server1 ~]# echo PATH=$PATH:/usr/local/tripwire/sbin >> .bashrc ; source .bashrc

■Tripwireの設定

設定ファイル(テキスト版)を編集
[root@server1 ~]# vi /etc/tripwire/twcfg.txt
ROOT                   =/usr/local/tripwire/sbin
POLFILE                =/etc/tripwire/tw.pol
DBFILE                 =/usr/local/tripwire/lib/tripwire/$(HOSTNAME).twd
REPORTFILE             =/usr/local/tripwire/lib/tripwire/report/$(HOSTNAME)-$(DATE).twr
SITEKEYFILE            =/etc/tripwire/site.key
LOCALKEYFILE           =/etc/tripwire/server1.yokensaka.com-local.key
EDITOR                 =/bin/vi
LATEPROMPTING          =false
LOOSEDIRECTORYCHECKING =false
↓
LOOSEDIRECTORYCHECKING =true
MAILNOVIOLATIONS       =true
EMAILREPORTLEVEL       =3
REPORTLEVEL            =3
↓
REPORTLEVEL            =4
MAILMETHOD             =SENDMAIL
SYSLOGREPORTING        =false
MAILPROGRAM            =/usr/sbin/sendmail -oi -t
設定ファイル(テキスト版⇒暗号署名版)を作成
[root@server1 ~]# twadmin -m F -c /etc/tripwire/tw.cfg -S /etc/tripwire/site.key /etc/tripwire/twcfg.txt
Please enter your site passphrase: ← サイトパスフレーズを入力
Wrote configuration file: /etc/tripwire/tw.cfg
セキュリティ確保のため設定ファイル(テキスト版)を削除
[root@server1 ~]# rm -f /etc/tripwire/twcfg.txt
設定ファイル(テキスト版)を復活させる場合は以下のコマンドで復活できる
[root@server1~]# twadmin --print-cfgfile > /etc/tripwire/twcfg.txt

■ポリシーファイルの設定

ポリシーファイルの最適化スクリプトを作成
[root@server1 ~]# vi /etc/tripwire/twpolmake.pl
#!/usr/bin/perl
# Tripwire Policy File customize tool
# ----------------------------------------------------------------------
# Copyright (C) 2003 Hiroaki Izumi
# This program is free software; you can redistribute it and/or
# modify it under the terms of the GNU General Public License
# as published by the Free Software Foundation; either version 2
# of the License, or (at your option) any later version.
# This program is distributed in the hope that it will be useful,
# but WITHOUT ANY WARRANTY; without even the implied warranty of
# MERCHANTABILITY or FITNESS FOR A PARTICULAR PURPOSE.  See the
# GNU General Public License for more details.
# You should have received a copy of the GNU General Public License
# along with this program; if not, write to the Free Software
# Foundation, Inc., 59 Temple Place - Suite 330, Boston, MA  02111-1307, USA.
# ----------------------------------------------------------------------
# Usage:
#    perl twpolmake.pl {Pol file}
# ----------------------------------------------------------------------
#
$POLFILE=$ARGV[0];
open(POL,"$POLFILE") or die "open error: $POLFILE" ;
my($myhost,$thost) ;
my($sharp,$tpath,$cond) ;
my($INRULE) = 0 ;
while (<POL>) {
chomp;
if (($thost) = /^HOSTNAME\s*=\s*(.*)\s*;/) {
$myhost = `hostname` ; chomp($myhost) ;
if ($thost ne $myhost) {
$_="HOSTNAME=\"$myhost\";" ;
}
}
elsif ( /^{/ ) {
$INRULE=1 ;
}
elsif ( /^}/ ) {
$INRULE=0 ;
}
elsif ($INRULE == 1 and ($sharp,$tpath,$cond) = /^(\s*\#?\s*)(\/\S+)\b(\s+->\s+.+)$/) {
$ret = ($sharp =~ s/\#//g) ;
if ($tpath eq '/sbin/e2fsadm' ) {
$cond =~ s/;\s+(tune2fs.*)$/; \#$1/ ;
}
if (! -s $tpath) {
$_ = "$sharp#$tpath$cond" if ($ret == 0) ;
}
else {
$_ = "$sharp$tpath$cond" ;
}
}
print "$_\n" ;
}
close(POL) ;
ポリシーファイルの最適化
[root@server1 ~]# perl /etc/tripwire/twpolmake.pl /etc/tripwire/twpol.txt > /etc/tripwire/twpol.txt.new
ポリシーファイル(暗号署名版)を作成
[root@server1 ~]# twadmin -m P -c /etc/tripwire/tw.cfg -p /etc/tripwire/tw.pol -S /etc/tripwire/site.key /etc/tripwire/twpol.txt.new
Please enter your site passphrase: ← サイトパスフレーズを入力
Wrote policy file: /etc/tripwire/tw.pol
ポリシーファイル(テキスト版)を削除
[root@server1 ~]# rm -f /etc/tripwire/twpol.txt*
ポリシーファイル(テキスト版)を復活させる場合は以下のコマンドで復活できる
[root@server1 ~]# twadmin -m p -c /etc/tripwire/tw.cfg -p /etc/tripwire/tw.pol -S /etc/tripwire/site.key > /etc/tripwire/twpol.txt

■Tripwireのデータベース作成

ポリシーファイルよりデータベースを作成
[root@server1 ~]# tripwire -m i -s -c /etc/tripwire/tw.cfg
Please enter your local passphrase: ← ローカルパスフレーズを入力
※データベースを作成するには結構時間かかる

■Tripwireの確認

ファイル変更をチェック ※結構時間かかる
[root@server1 ~]# tripwire -m c -s -c /etc/tripwire/tw.cfg
Open Source Tripwire(R) 2.4.2.2 Integrity Check Report
Report generated by:          root
Report created on:            2013年01月15日 02時44分53秒
Database last updated on:     Never
===============================================================================
Report Summary:
===============================================================================
Host name:                    server1.yokensaka.com
Host IP address:              60.34.241.151
Host ID:                      None
Policy file used:             /etc/tripwire/tw.pol
Configuration file used:      /etc/tripwire/tw.cfg
Database file used:           /usr/local/tripwire/lib/tripwire/server1.yokensaka.com.twd
Command line used:            tripwire -m c -s -c /etc/tripwire/tw.cfg
===============================================================================
Rule Summary:
===============================================================================
-------------------------------------------------------------------------------
Section: Unix File System
-------------------------------------------------------------------------------
Rule Name                       Severity Level    Added    Removed  Modified
---------                       --------------    -----    -------  --------
* Tripwire Data Files             0                 1        0        0
* Monitor Filesystems             0                 0        0        5
User Binaries and Libraries     0                 0        0        0
Tripwire Binaries               0                 0        0        0
OS Binaries and Libraries       0                 0        0        0
Temporary Directories           0                 0        0        0
Global Configuration Files      0                 0        0        0
System Boot Changes             0                 0        0        0
RPM Checksum Files              0                 0        0        0
* OS Boot Files and Mount Points  0                 0        0        1
* OS Devices and Misc Directories 0                 0        24       1
Root Directory and Files        0                 0        0        0
Total objects scanned:  186790
Total violations found:  32
===============================================================================
Object Summary:
===============================================================================
-------------------------------------------------------------------------------
# Section: Unix File System
-------------------------------------------------------------------------------
-------------------------------------------------------------------------------
Rule Name: Tripwire Data Files (/usr/local/tripwire/lib/tripwire)
Severity Level: 0
-------------------------------------------------------------------------------
Added:
"/usr/local/tripwire/lib/tripwire/server1.yokensaka.com.twd"
-------------------------------------------------------------------------------
Rule Name: Monitor Filesystems (/var)
Severity Level: 0
-------------------------------------------------------------------------------
Modified:
"/var/lib/NetworkManager/timestamps"
"/var/lib/samba/browse.dat"
"/var/lib/samba/unexpected.tdb"
"/var/spool/postfix/public/pickup"
"/var/spool/postfix/public/qmgr"
-------------------------------------------------------------------------------
Rule Name: OS Boot Files and Mount Points (/boot)
Severity Level: 0
-------------------------------------------------------------------------------
Modified:
"/boot/grub/stage2"
-------------------------------------------------------------------------------
Rule Name: OS Devices and Misc Directories (/dev)
Severity Level: 0
-------------------------------------------------------------------------------
Removed:
"/dev/char/13:33"
"/dev/char/13:67"
"/dev/char/189:503"
"/dev/char/250:0"
"/dev/input/by-id/usb-Logitech_USB_Optical_Mouse-event-mouse"
"/dev/input/by-id/usb-Logitech_USB_Optical_Mouse-mouse"
"/dev/input/by-path/pci-0000:00:12.0-usb-0:2:1.0-event-mouse"
"/dev/input/by-path/pci-0000:00:12.0-usb-0:2:1.0-mouse"
"/dev/input/event3"
"/dev/input/mouse1"
"/dev/.udev/db/hidraw:hidraw0"
"/dev/.udev/db/input:event3"
"/dev/.udev/db/input:mouse1"
"/dev/.udev/db/usb:4-2"
"/dev/.udev/links/input\\x2fby-id\\x2fusb-Logitech_USB_Optical_Mouse-event-mouse"
"/dev/.udev/links/input\\x2fby-id\\x2fusb-Logitech_USB_Optical_Mouse-event-mouse/c13:67"
"/dev/.udev/links/input\\x2fby-id\\x2fusb-Logitech_USB_Optical_Mouse-mouse"
"/dev/.udev/links/input\\x2fby-id\\x2fusb-Logitech_USB_Optical_Mouse-mouse/c13:33"
"/dev/.udev/links/input\\x2fby-path\\x2fpci-0000:00:12.0-usb-0:2:1.0-event-mouse"
"/dev/.udev/links/input\\x2fby-path\\x2fpci-0000:00:12.0-usb-0:2:1.0-event-mouse/c13:67"
"/dev/.udev/links/input\\x2fby-path\\x2fpci-0000:00:12.0-usb-0:2:1.0-mouse"
"/dev/.udev/links/input\\x2fby-path\\x2fpci-0000:00:12.0-usb-0:2:1.0-mouse/c13:33"
"/dev/bus/usb/004/120"
"/dev/hidraw0"
Modified:
"/dev/.udev/queue.bin"
===============================================================================
Error Report:
===============================================================================
No Errors
-------------------------------------------------------------------------------
*** End of report ***
Open Source Tripwire 2.4 Portions copyright 2000 Tripwire, Inc. Tripwire is a registered
trademark of Tripwire, Inc. This software comes with ABSOLUTELY NO WARRANTY;
for details use --version. This is free software which may be redistributed
or modified only under certain conditions; see COPYING for details.
All rights reserved.

■Tripwireの定期自動実行設定

Tripwireの定期実行スクリプトを作成
[root@server1 ~]# vi tripwire.sh
#!/bin/bash
PATH=/usr/sbin:/usr/bin:/bin:/usr/local/tripwire/sbin
# パスフレーズ設定
LOCALPASS=xxxxxxxx # ローカルパスフレーズ
SITEPASS=xxxxxxxx  # サイトパスフレーズ
cd /etc/tripwire
# Tripwireチェック実行
tripwire -m c -s -c tw.cfg|mail -s "Tripwire(R) Integrity Check Report in `hostname`" root
# ポリシーファイル最新化
twadmin -m p -c tw.cfg -p tw.pol -S site.key > twpol.txt
perl twpolmake.pl twpol.txt > twpol.txt.new
twadmin -m P -c tw.cfg -p tw.pol -S site.key -Q $SITEPASS twpol.txt.new > /dev/null
rm -f twpol.txt* *.bak
# データベース最新化
rm -f /usr/local/tripwire/lib/tripwire/*.twd*
tripwire -m i -s -c tw.cfg -P $LOCALPASS
実行スクリプトに実行権を与える
[root@server1 ~]# chmod 700 tripwire.sh
cronを編集
[root@server1 ~]# crontab -e
00 01 * * * /root/tripwire.sh
毎日1:00にTripwireの定期実行スクリプトを実行

Tripwireのアンインストール方法

[root@server1 ~]# rm -rf /usr/local/tripwire/
[root@server1 ~]# rm -rf /etc/tripwire/

Nucleus v3.65 不具合

Nucleus v3.65 にバージョンアップしたところ、Multiple Categories [Custom Edition]で、「サブカテゴリの新規作成」で「新しいサブカテゴリを作成」ボタンを押しても、空白画面になり新しいサブカテゴリが作成されないという不具合が発生。
そこで、nucleus/plugins/multiplecategories/index.php の487行目からの6行を

$manager->notify(
'PostAddSubcat',
array(
'subcatid' => $newid
)
);

以下のように修正。

$data = array( 'subcatid' => $newid );
$manager->notify(
'PostAddSubcat',
$data
);

あと、576行からの6行も同じように修正。

$data = array( 'subcatid' => $id );
$manager->notify(
'PostDeleteSubcat',
$data
);

これでサブカテゴリーを追加できるようになるが、アイテム編集画面でサブカテゴリーの追加及び削除ができないという問題が発生。どうも、Nucleus Ver3.65 のバグらしい。
そこで、nucleus/libs/ITEM.php の216行目を以下のように修正。

'	itemid'		=>  $itemid,
                    ↓        ↓        ↓ 
'itemid'	=>  $itemid,

予備サーバー

今使ってる自宅サーバーのメインマシンは、HP ProLiant MicroServer N36L(1.3GHz、15W、2MB)というものだが、HP ProLiant MicroServer N40L(1.5GHz、15W、2MB)250GBモデルというのが、17,580円というかなり安い値段で出てたので、予備サーバー用にと思いポチッとしてしまった。HP ProLiant MicroServer N54Lという新しいのが出たので安くなったようだ。
HP ProLiant MicroServerは、
初代  AMD Athlon™ II NEO N36Lプロセッサー(1.3GHz、15W、2MB)
二代目 AMD Athlon™ II NEO N40Lプロセッサー(1.5GHz、15W、2MB)
三代目 AMD Athlon™ II NEO N54Lプロセッサー(2.2GHz、25W、2MB)
という風にCPUが徐々に進化してるようで、今回買ったのは二代目のもの。
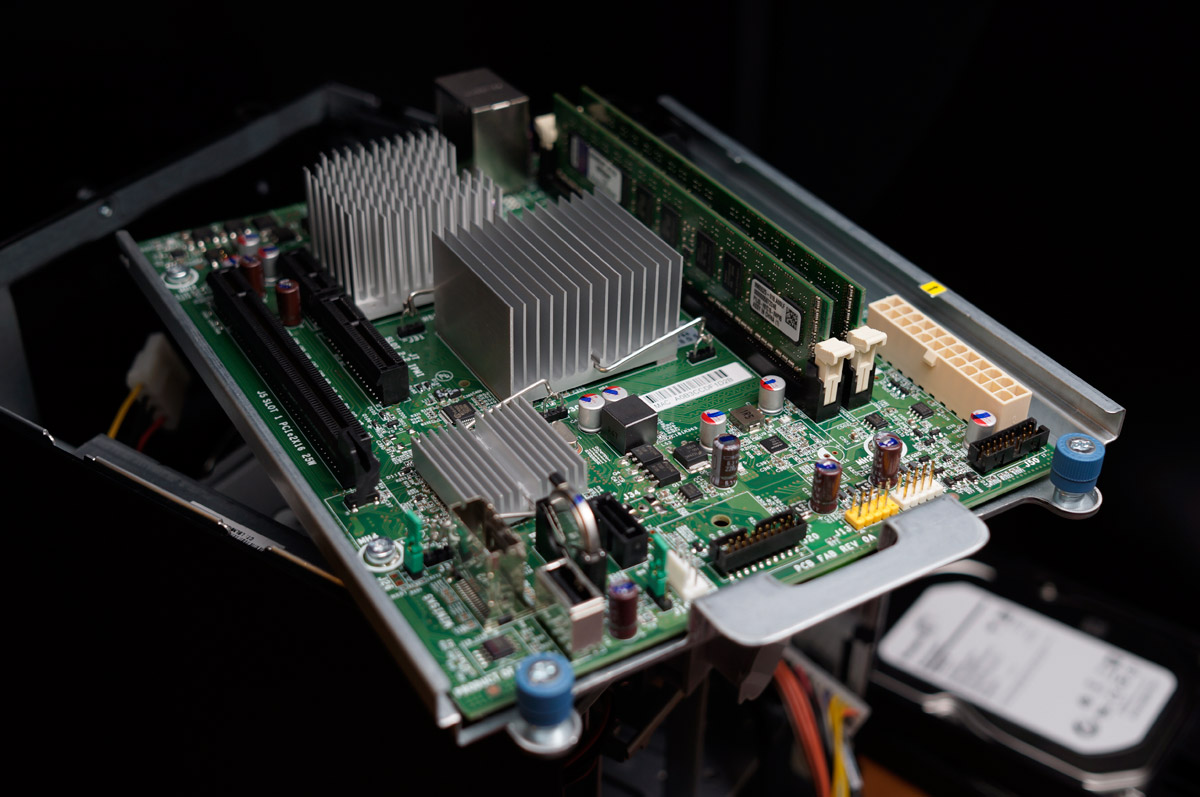
これがマザーボード。メモリーは2GBが1枚挿さってたが、4GBを2枚挿して8GBにした。
20130115-7861
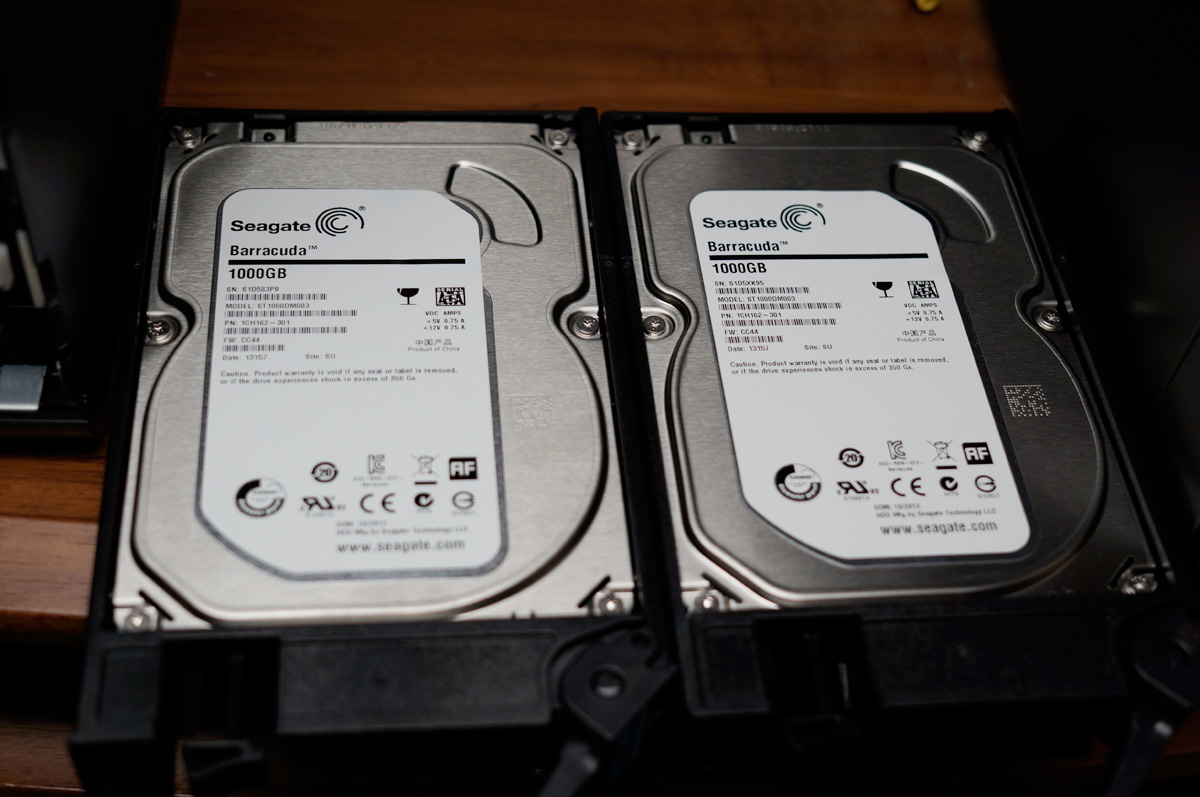
ハードディスクは250GBが1台付いてたが、RAIDで組みたいのとファイルサーバーとしても使いたいので250GBを外して1TBを2台追加。
20130115-7865
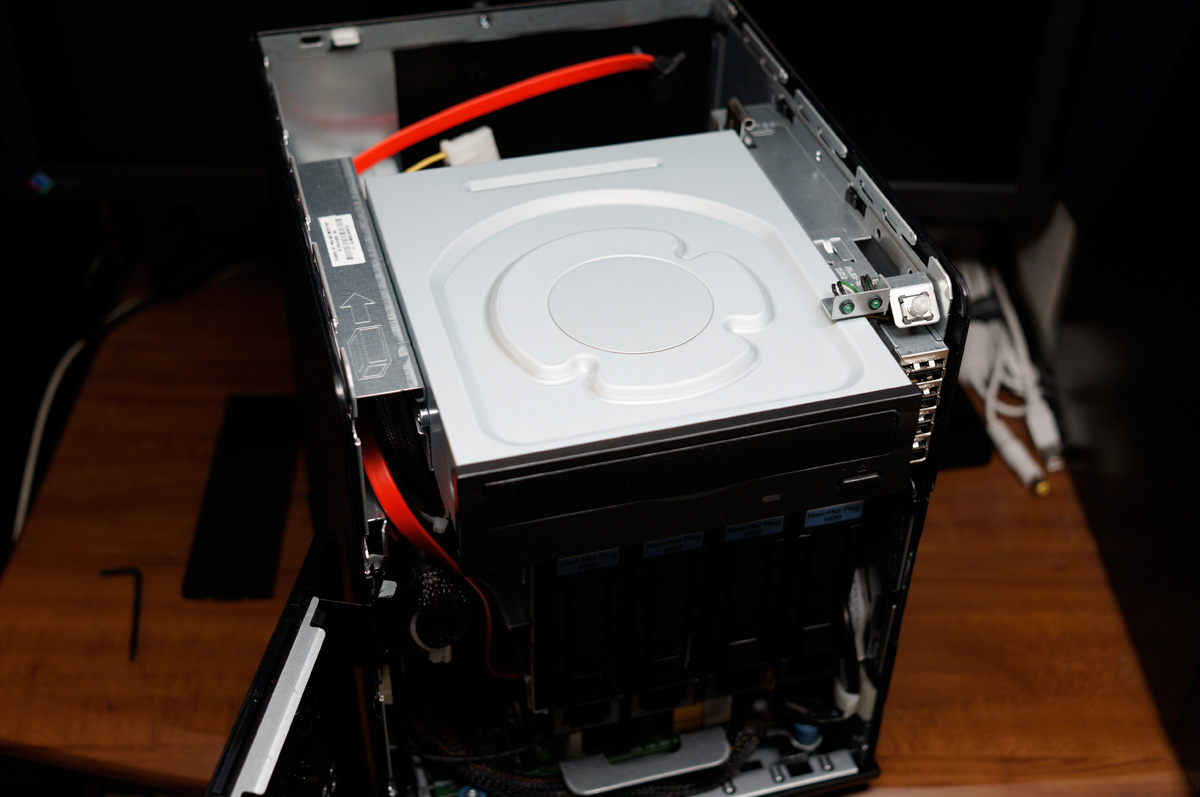
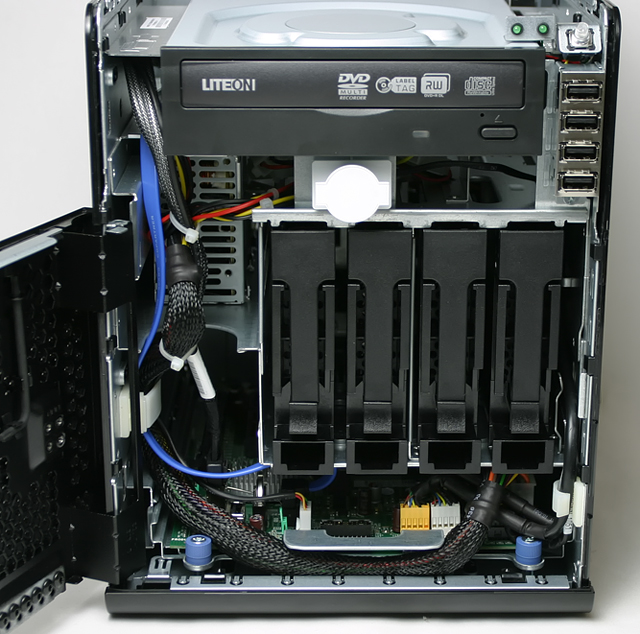
家にあったDVDドライブを繋いで・・
20130115-7866
HP ProLiant MicroServer(26.7×21.0×26.0cm)を2段重ねにして2台体勢の自宅サーバーとする。
20130115-7871
しかし、1TBのHDDを2台、4GBのメモリーを2枚追加しても、4万ちょっとでサーバーができちゃうんだから安くなったもんだ。一昔前では考えられない。

EUCからUTF-8で文字化け解消方法

自宅サーバーを構築した頃はサーバーもクライアントも文字コードをeucにしていたが、CentOS4以降、標準文字コードがutf-8になった。特にSSHなどでサーバーにリモート接続して操作する場合にはサーバーとクライアントの文字コードが違うと文字化けが発生してしまう。また、MySQLを使ったブログなどは文字コードが違うと後で直すのは更に厄介だ。今までは文字化けしないように騙し騙しやってきてたが、今回、サーバーをCentOSの64bit版、utf-8で再構築したので、昔からのMySQLのデータもすべてをutf-8で統一することにした。どうすればいいのかネットで調べてもなかなか有力な情報が得られなかったが、下記の方法でなんとかutf-8に統一することが出来た。
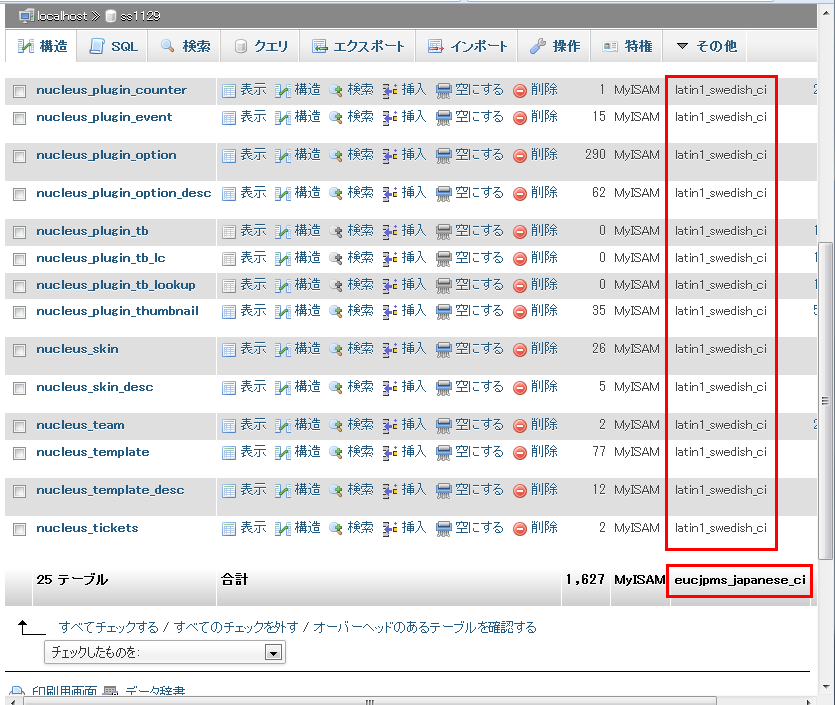
まず、phpmyadminで確認すると、データベースはeucjpms_japanese_ci、各テーブルはlatin1_swedish_ciになっている。テーブルの中身もしっかり文字化けしている。
20121103-latin_1
当然この状態でテーブルの照合順序をutf-8にしても、データベース全体をutf-8にしても文字化けは解消されない。また、mysqldumpでエクスポートしたものも、文字化けしているテーブルと文字化けしていないテーブルがある。なので、各テーブルごとにmysqldumpでエクスポート、各テーブルごとに文字化けを修正し文字コードをutf-8にして保存。直した各テーブルをmysqlでインポートすることでほぼ文字化けが解消した。
手順は下記の通り
phpmyadminでデータベースのテーブルを確認し全テーブルをbackupフォルダにエクスポート。mysqlのrootパスワード(********) データベース名(centos) テーブル名(nucleus_item) 保存フォルダ場所(backup)の場合

[root@server1 ~]# mysqldump -uroot -p******** centos nucleus_item --default-character-set=binary > /backup/nucleus_item.sql

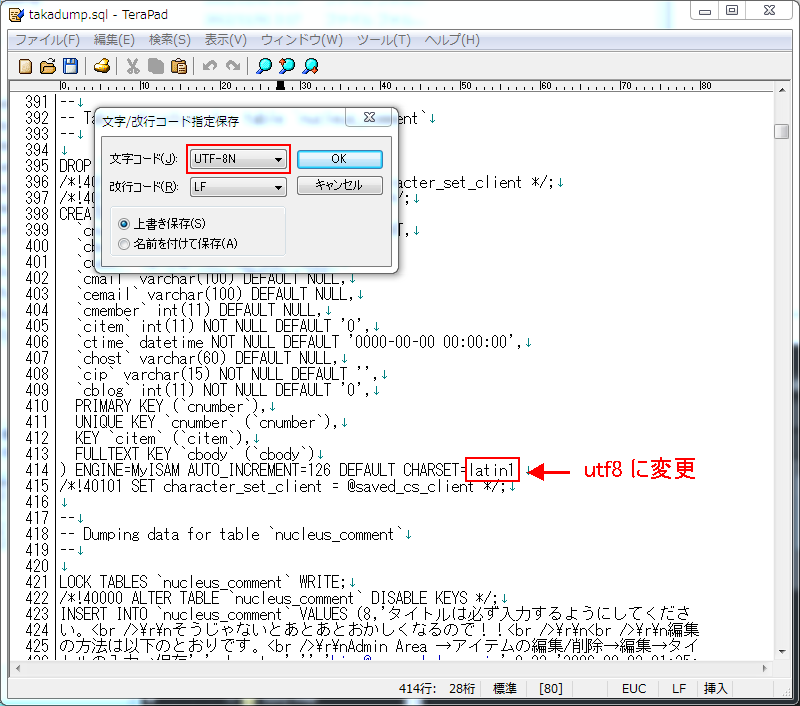
mysqldumpでエクスポートしたそれぞれのテーブルのデータをテキストエディタで開き、latin1になってたところをutf8に修正、文字化けしてないか確認し、文字化けしてるようであれば文字化けが解消する文字コードで一旦読み込み、文字化けを直してから文字コードをutf-8nに指定して保存。文字化けしてなければそのまま文字コードをutf-8nに指定して保存。
20121103-utf-n8
修正が終わったらそれぞれのテーブルをmysqlコマンドでインポート。

[root@server1 ~]# mysql -uroot -p******** centos --default-character-set=binary < /backup/nucleus_item.sql

mysqlでインポートする際、幾つかのテーブルがエラーになったが、どうもデータ容量が大きいためらしい。デフォルトの最大サイズは1Mらしいので、大きいデータでもインポート出来るように16Mに変更。
/etc/my.cnfを修正。

[root@server1 ~]# vi /etc/my.cnf
[mysqld]
max_allowed_packet=16M ← 追加

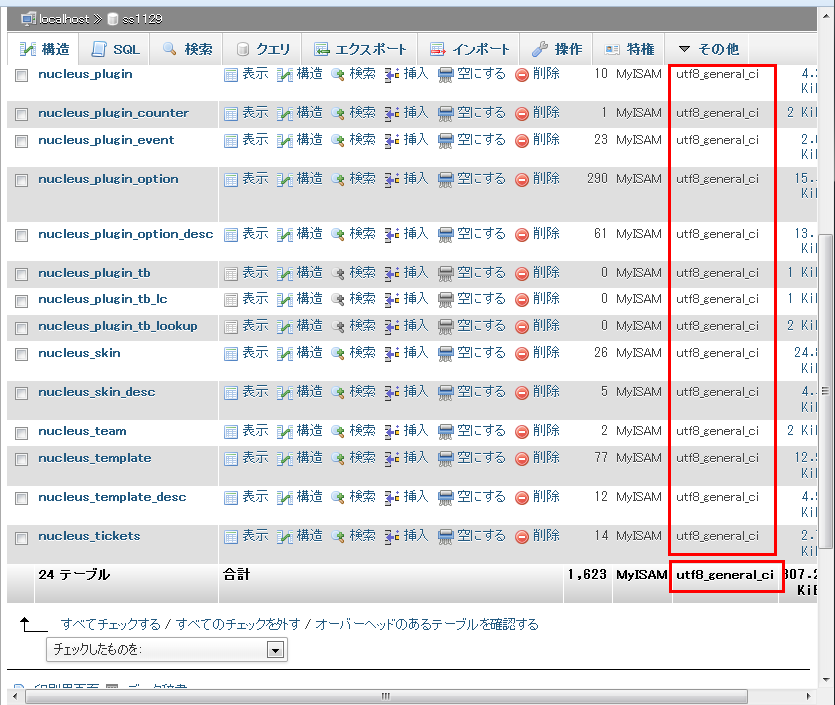
最後に、phpmyadminでデータベースの照合順序をeucjpms_japanese_ciからutf8_general_ciに変更。あとはNucleusのグローバル設定の使用する言語をjapanese-eucからjapanese-utf8に変更。設定画面上のサイト名が文字化けしてたが手入力で修正。これでサーバーとクライアントの文字コードがutf-8で統一され文字化けが解消した。
20121103-utf8
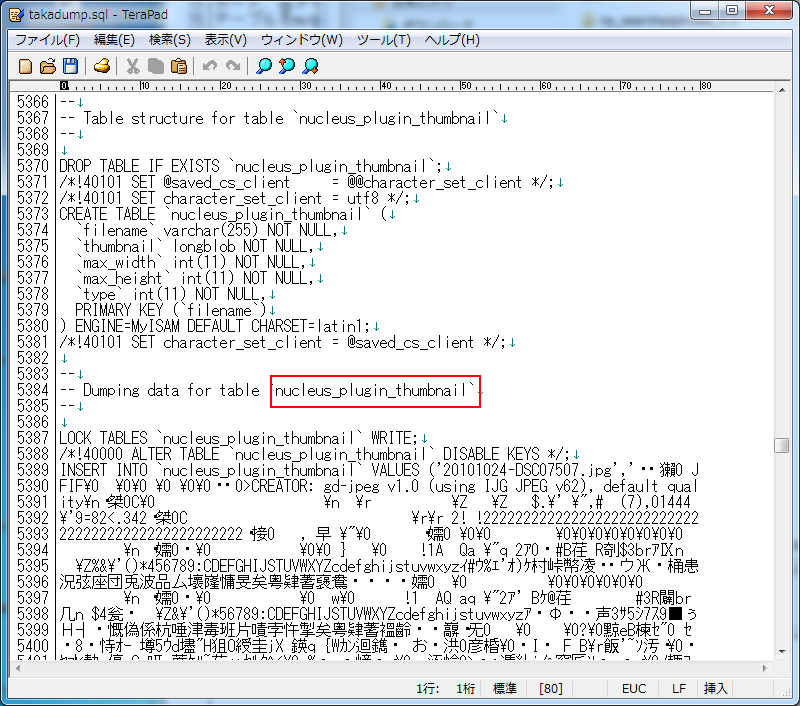
Thumbnailデータはどの文字コードで読み込んでもことごとく文字化けしてて修正不能だった為、一旦データそのものをMySQLから削除して作業続行。
20121103-thumbnail
Thumbnailプラグインもバージョンが上がってたので新しいものをインストール。テーブルを作りなおすことで文字化けが解消した。

phpMyAdminをyumでインストール

今までは、wgetでソースからインストールしてたが、バージョンアップのたびにソースからインストールするのは面倒なので、yumでインストールすることにした。phpMyAdminは標準のリポジトリには入っていないのでEPELリポジトリを追加しておく。
■ phpMyAdminインストール

[root@server1 ~]# yum install phpmyadmin
Loaded plugins: fastestmirror, priorities, refresh-packagekit
Loading mirror speeds from cached hostfile
epel/metalink                                                                | 5.0 kB     00:00
* base: www.ftp.ne.jp
* centosplus: www.ftp.ne.jp
* epel: ftp.jaist.ac.jp
* extras: www.ftp.ne.jp
* rpmforge: ftp.riken.jp
* updates: www.ftp.ne.jp
117 packages excluded due to repository priority protections
Setting up Install Process
Resolving Dependencies
--> Running transaction check
---> Package phpMyAdmin.noarch 0:3.5.2.2-1.el6 will be installed
--> Processing Dependency: php-php-gettext for package: phpMyAdmin-3.5.2.2-1.el6.noarch
--> Running transaction check
---> Package php-php-gettext.noarch 0:1.0.11-3.el6 will be installed
--> Finished Dependency Resolution
Dependencies Resolved
====================================================================================================
Package                     Arch               Version                      Repository        Size
====================================================================================================
Installing:
phpMyAdmin                  noarch             3.5.2.2-1.el6                epel             4.3 M
Installing for dependencies:
php-php-gettext             noarch             1.0.11-3.el6                 epel              21 k
Transaction Summary
====================================================================================================
Install       2 Package(s)
Total download size: 4.3 M
Installed size: 17 M
Is this ok [y/N]: y
Downloading Packages:
(1/2): php-php-gettext-1.0.11-3.el6.noarch.rpm                               |  21 kB     00:00
(2/2): phpMyAdmin-3.5.2.2-1.el6.noarch.rpm                                   | 4.3 MB     00:00
----------------------------------------------------------------------------------------------------
Total                                                               5.1 MB/s | 4.3 MB     00:00
Running rpm_check_debug
Running Transaction Test
Transaction Test Succeeded
Running Transaction
Installing : php-php-gettext-1.0.11-3.el6.noarch                                              1/2
Installing : phpMyAdmin-3.5.2.2-1.el6.noarch                                                  2/2
Verifying  : php-php-gettext-1.0.11-3.el6.noarch                                              1/2
Verifying  : phpMyAdmin-3.5.2.2-1.el6.noarch                                                  2/2
Installed:
phpMyAdmin.noarch 0:3.5.2.2-1.el6
Dependency Installed:
php-php-gettext.noarch 0:1.0.11-3.el6
Complete!

■ 設定
Apacheのバージョンによって編集する場所が違う。
# httpd -v でApacheのバージョン確認できる。

[root@server1 ~]# vi /etc/httpd/conf.d/phpMyAdmin.conf
# phpMyAdmin - Web based MySQL browser written in php
#
# Allows only localhost by default
#
# But allowing phpMyAdmin to anyone other than localhost should be considered
# dangerous unless properly secured by SSL
Alias /phpMyAdmin /usr/share/phpMyAdmin
Alias /phpmyadmin /usr/share/phpMyAdmin
<Directory /usr/share/phpMyAdmin/>
<IfModule mod_authz_core.c>
# Apache 2.4
<RequireAny>
Require ip 127.0.0.1
Require ip ::1
</RequireAny>
</IfModule>
<IfModule !mod_authz_core.c>
# Apache 2.2
Order Deny,Allow
Deny from All
Allow from 127.0.0.1
Allow from ::1
Allow from 192.168.1.  ← 追加:内部ネットワークからのアクセスを許可
Allow from ***.***.***.***  ← 追加:特定の外部IPからのアクセスを許可する場合
</IfModule>
</Directory>
<Directory /usr/share/phpMyAdmin/setup/>
<IfModule mod_authz_core.c>
# Apache 2.4
<RequireAny>
Require ip 127.0.0.1
Require ip ::1
</RequireAny>
</IfModule>
<IfModule !mod_authz_core.c>
# Apache 2.2
Order Deny,Allow
Deny from All
Allow from 127.0.0.1
Allow from ::1
</IfModule>
</Directory>
# These directories do not require access over HTTP - taken from the original
# phpMyAdmin upstream tarball
#
<Directory /usr/share/phpMyAdmin/libraries/>
Order Deny,Allow
Deny from All
Allow from None
</Directory>
Apache設定反映
[root@server1 ~]# service httpd restart
httpd を停止中:                                            [  OK  ]
httpd を起動中:                                            [  OK  ]

■ phpMyAdmin確認
http://サーバー名/phpmyadmin/へアクセスして、phpMyAdminのログイン画面が表示されること
MySQLに登録されているアカウントでログインできること

freshclam でエラー

今朝、freshclamが正常に動いてなくエラーになってるメールが届いた。
/etc/cron.daily/freshclam:
ERROR: Problem with internal logger (UpdateLogFile = /var/log/clamav/freshclam.log).
ERROR: Can’t open /var/log/clamav/freshclam.log in append mode (check permissions!).
どうもパーミッションが悪いからエラーになってるようだ。
ログのオーナーを確認

[root@server1 ~]# ll /var/log/clamav
合計 200
-rw-r--r-- 1 clamav clamav  9824 10月  1 23:52 2012 clamd.log
-rw-r--r-- 1 clam   clam   26371  9月  9 08:24 2012 clamd.log-20120909
-rw-r--r-- 1 clam   clam   26769  9月 16 08:22 2012 clamd.log-20120916
-rw-r--r-- 1 clam   clam   26828  9月 23 08:38 2012 clamd.log-20120923
-rw-r--r-- 1 clam   clam   54325  9月 30 07:07 2012 clamd.log-20120930
-rw-r--r-- 1 clamav clamav     0  9月 30 07:07 2012 freshclam.log
-rw-r--r-- 1 clam   clam    4401  9月  9 08:24 2012 freshclam.log-20120909
-rw-r--r-- 1 clam   clam    4917  9月 16 08:22 2012 freshclam.log-20120916
-rw-r--r-- 1 clam   clam    5084  9月 23 08:38 2012 freshclam.log-20120923
-rw-r--r-- 1 clam   clam    4841  9月 30 07:07 2012 freshclam.log-20120930

古いものはオーナーが clam だが新しいものは clamav になっている。
オーナーの変更

[root@server1 ~]# chown clamav:clamav /var/log/clamav/clamd*
[root@server1 ~]# chown clamav:clamav /var/log/clamav/freshclam*

再確認

[root@server1 ~]# ll /var/log/clamav
合計 200
-rw-r--r-- 1 clamav clamav 10159 10月  2 00:22 2012 clamd.log
-rw-r--r-- 1 clamav clamav 26371  9月  9 08:24 2012 clamd.log-20120909
-rw-r--r-- 1 clamav clamav 26769  9月 16 08:22 2012 clamd.log-20120916
-rw-r--r-- 1 clamav clamav 26828  9月 23 08:38 2012 clamd.log-20120923
-rw-r--r-- 1 clamav clamav 54325  9月 30 07:07 2012 clamd.log-20120930
-rw-r--r-- 1 clamav clamav     0  9月 30 07:07 2012 freshclam.log
-rw-r--r-- 1 clamav clamav  4401  9月  9 08:24 2012 freshclam.log-20120909
-rw-r--r-- 1 clamav clamav  4917  9月 16 08:22 2012 freshclam.log-20120916
-rw-r--r-- 1 clamav clamav  5084  9月 23 08:38 2012 freshclam.log-20120923
-rw-r--r-- 1 clamav clamav  4841  9月 30 07:07 2012 freshclam.log-20120930

freshclam を使用して VirusDB をアップデート

[root@server1 ~]# freshclam
ERROR: Can't open /var/log/clamav/freshclam.log in append mode (check permissions!).
ERROR: Problem with internal logger (UpdateLogFile = /var/log/clamav/freshclam.log).

やはりエラーになり、アップデート出来ない。
/etc/freshclam.conf を確認。
DatabaseOwner が clam になってたので clamav に直す。

[root@server1 ~]# vi /etc/freshclam.conf
# By default when started freshclam drops privileges and switches to the
# "clamav" user. This directive allows you to change the database owner.
# Default: clamav (may depend on installation options)
DatabaseOwner clam
    ↓
DatabaseOwner clamav

/etc/logrotate.d/freshclam を確認。
ここは clamav だったが、clam になってたら clamav に直す。

[root@server1 ~]# vi /etc/logrotate.d/freshclam
/var/log/clamav/freshclam.log {
missingok
notifempty
create 644 clamav clamav ← clam になってたら  clamav に直す
}

再度 VirusDB をアップデート

[root@server1 ~]# freshclam
ERROR: Can't create temporary directory /var/lib/clamav/clamav-b130a8764a48d3f68ae52c545a0a9c06
Hint: The database directory must be writable for UID 502 or GID 502

テンポラリファル/var/lib/clamav/clamav-*を作れない。
データベースのディレクトリは UID 502 または GID 502 が書き込み可能である必要がある。
というエラーが出る。
UID 502 または GID 502 を書き込み可能に変更

[root@server1 ~]# chown 502:502 /var/lib/clamav
[root@server1 ~]# chmod 755 /var/lib/clamav
として VirusDB をアップデート
[root@server1 ~]# freshclam
ClamAV update process started at Tue Oct  2 00:34:26 2012
main.cvd is up to date (version: 54, sigs: 1044387, f-level: 60, builder: sven)
nonblock_connect: connect timing out (30 secs)
Can't connect to port 80 of host db.jp.clamav.net (IP: 219.106.242.51)
Trying host db.jp.clamav.net (120.29.176.126)...
ERROR: Can't open /var/lib/clamav/mirrors.dat for writing
Downloading daily-15418.cdiff [100%]
ERROR: Can't open /var/lib/clamav/mirrors.dat for writing
Downloading daily-15419.cdiff [100%]
ERROR: Can't open /var/lib/clamav/mirrors.dat for writing
Downloading daily-15420.cdiff [100%]
ERROR: Can't open /var/lib/clamav/mirrors.dat for writing
daily.cld updated (version: 15435, sigs: 275855, f-level: 63, builder: neo)
bytecode.cld is up to date (version: 190, sigs: 36, f-level: 63, builder: neo)
ERROR: Can't open /var/lib/clamav/mirrors.dat for writing
Database updated (1320278 signatures) from db.jp.clamav.net (IP: 203.178.137.175)

/var/lib/clamav/mirrors.dat もオーナーが違うようだ。
なので、/var/lib/clamav/mirrors.dat もオーナー変更して VirusDB をアップデート。

[root@server1 ~]# chown clamav:clamav /var/lib/clamav/mirrors.dat
[root@server1 ~]# freshclam
ClamAV update process started at Tue Oct  2 00:36:35 2012
main.cvd is up to date (version: 54, sigs: 1044387, f-level: 60, builder: sven)
nonblock_connect: connect timing out (30 secs)
Can't connect to port 80 of host db.jp.clamav.net (IP: 219.106.242.51)
Downloading daily-15433.cdiff [100%]
Downloading daily-15434.cdiff [100%]
Downloading daily-15435.cdiff [100%]
daily.cld updated (version: 15435, sigs: 275855, f-level: 63, builder: neo)
bytecode.cld is up to date (version: 190, sigs: 36, f-level: 63, builder: neo)
Database updated (1320278 signatures) from db.jp.clamav.net (IP: 203.178.137.175)

アップデート出来た。とりあえずこれで様子を見てみよう。

rootkit検知

rootkit検知時のみroot宛にメール送信するようになってるが、今朝、Cron /root/chkrootkit.shから、次のようなメールが届いた。
Searching for Suckit rootkit… Warning: /sbin/init INFECTED
調べてみると、リブートしたら検知されなくなったという書き込みがあるので、とりあえずリブートして、rootkitのチェックを行う。

[root@server1 ~]# chkrootkit | grep INFECTED
[root@server1 ~]# 

なにも検知されない。
メインサーバと予備サーバで、md5sum /sbin/initのコマンドを実行したところ、結果は全く同じで、INFECTEDされたような形跡はどうも無いようだ。

メインサーバ
[root@server1 ~]# md5sum /sbin/init
5fff3eac49eecf6625085dd9d0f39292  /sbin/init
予備サーバ
[root@server2 ~]# md5sum /sbin/init
5fff3eac49eecf6625085dd9d0f39292  /sbin/init

rpm -V `rpm -qf /sbin/init`を実行し、なにか表示されたら変更された可能性がある。
S ファイルサイズが異なっている
5 MD5チェックサムが異なる
L シンボリックリンクが変更されている
T ファイルの更新時刻が変更されている
D デバイスファイルが変更されている
U ファイルの所有者が変更されている
G ファイルの所有グループが変更されている
M ファイルのパーミッションが変更されている

[root@server1 ~]# rpm -V `rpm -qf /sbin/init`
[root@server1 ~]#

何も表示されない。
今日のところはひとまずよしとするが、もう少し調べてみて本当にrootkitに感染してるようなら、再インストールするしか無いかも。

メインサーバ機入れ替え

途中でパーツを新しくしたものもあるが、サーバ自体はかれこれ6年になる。特にこれといって不満があるわけでもないが、そろそろ新しいサーバにバトンタッチする時期かなと思い入れ替えることにした。
■ ProLiant MicroServer
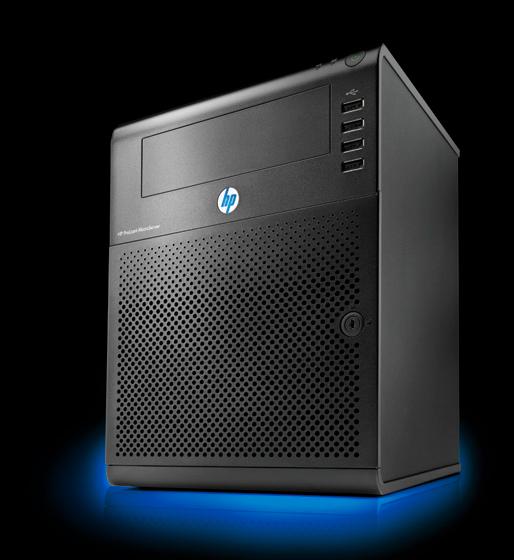
本体はHPのProLiant MicroServerを購入。HDDが4台内蔵可能、その割には、21×26×26.7cmと非常にコンパクト。
20110923-proliant_microserver.jpg
中はこんな感じ。
RAIDで組むので250GBのHDDが2台、OSインストール用にDVDドライブを追加して有る。
20110923-img_7253
■ 仕様
プロセッサー AMD Athlon™ II NEO N36Lプロセッサー(1.3GHz、15W、2MB)×1
キャッシュメモリ 1MB L2×2
メモリ 1GB 1×1GB)PC3-10600E DDR3 UB ECC
ストレージコントローラー オンボードSATAコントローラー、オンボードRAID(0、1)を搭載
ハードディスクドライブ 250GBノンホットプラグLFF SATA×2台
内蔵ストレージ ノンホットプラグSATA、最大8.0TB(4×2TB)
パワーサプライ 150Wノンホットプラグ、ノンリダンダントパワーサプライ
ネットワーキング オンボードNC107i PCI Express Gigabit サーバーアダプター
オプティカルドライブ DVDマルチドライブ
キーボード/マウス 標準ではなし
フォームファクター Ultra Microタワー型
これをメインサーバ機とし、CentOS6.0をソフトウェアーRAIDでインストールして運用開始。